A simple example showing how to implement a 7 segment digit display which will display a counter activated by a pushbutton.

Requirements
- uno board (or nano or mega.........).
- resistances.
- wires.
- 7 segment display.
- momentary push button.
Wiring
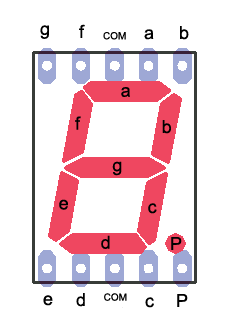
The first thing is to wire correctly the 7-segment displahy to the board, the 7-segment display looks like this one:

As you can see, there are 5 pins in both, top and bottom of it, where yu can recognize the bottom by the dot it has.
At a glance, the pins layout is as follows:
And is very important to check how are they connected to the board:

Always be sure to place the resistance beofre both ground connectors to pins 3 & 8 on the 7-segment display..
After you have wired it all up, you can test it by uploading the following sketch, which will go from 0 to 9 and from 9 to 0 in a contyinuous loop. just to test if all the segments of the display are working properly:
//////////////////////////////////////////////////////////////////////////////////
// Define the LED digit patters, from 0 - 9
// Note that these patterns are for common cathode displays
// For common anode displays, change the 1's to 0's and 0's to 1's
// 1 = LED on, 0 = LED off, in this order:
// Arduino pin: 2,3,4,5,6,7,8
////////////////////////////////////////////////////////////////////////////////////////////////////
byte seven_seg_digits[10][7] = {
{ 1,1,1,1,1,1,0 }, // = 0
{ 0,1,1,0,0,0,0 }, // = 1
{ 1,1,0,1,1,0,1 }, // = 2
{ 1,1,1,1,0,0,1 }, // = 3
{ 0,1,1,0,0,1,1 }, // = 4
{ 1,0,1,1,0,1,1 }, // = 5
{ 1,0,1,1,1,1,1 }, // = 6
{ 1,1,1,0,0,0,0 }, // = 7
{ 1,1,1,1,1,1,1 }, // = 8
{ 1,1,1,0,0,1,1 } // = 9
};
void setup() {
pinMode(2, OUTPUT);
pinMode(3, OUTPUT);
pinMode(4, OUTPUT);
pinMode(5, OUTPUT);
pinMode(6, OUTPUT);
pinMode(7, OUTPUT);
pinMode(8, OUTPUT);
pinMode(9, OUTPUT);
writeDot(0); // start with the "dot" off
}
void writeDot(byte dot) {
digitalWrite(9, dot);
}
void sevenSegWrite(byte digit) {
byte pin = 2;
for (byte segCount = 0; segCount < 7; ++segCount) {
digitalWrite(pin, seven_seg_digits[digit][segCount]);
++pin;
}
}
void loop() {
for (byte count = 10; count > 0; --count) {
delay(1000);
sevenSegWrite(count - 1);
}
for (byte count = 0; count < 10; ++count) {
delay(1000);
sevenSegWrite(count);
}
}
If not, you should check your connections, also check every number is displayed as it should be - with no missing or 'off' segments......
Connect the Push-Button
Now is time to connect the push-button and try to increment the counter every time it's pressed, after reaching 9, it should go back to zero '0' and start agaiin to count... and again....


Upload the Code:
// Define the LED digit patters, from 0 - 9
// Note that these patterns are for common cathode displays
// For common anode displays, change the 1's to 0's and 0's to 1's
// 1 = LED on, 0 = LED off, in this order:
// Arduino pin: 2,3,4,5,6,7,8
byte seven_seg_digits[10][7] = { { 1,1,1,1,1,1,0 }, // = 0
{ 0,1,1,0,0,0,0 }, // = 1
{ 1,1,0,1,1,0,1 }, // = 2
{ 1,1,1,1,0,0,1 }, // = 3
{ 0,1,1,0,0,1,1 }, // = 4
{ 1,0,1,1,0,1,1 }, // = 5
{ 1,0,1,1,1,1,1 }, // = 6
{ 1,1,1,0,0,0,0 }, // = 7
{ 1,1,1,1,1,1,1 }, // = 8
{ 1,1,1,1,0,1,1 } // = 9
};
int NGait = 1;
const int buttonPin = 12; // the number of the pushbutton pin
const int ledPin = 13; // the number of the LED pin
int buttonState = 0;
void setup() {
pinMode(2, OUTPUT);
pinMode(3, OUTPUT);
pinMode(4, OUTPUT);
pinMode(5, OUTPUT);
pinMode(6, OUTPUT);
pinMode(7, OUTPUT);
pinMode(8, OUTPUT);
pinMode(9, OUTPUT);
writeDot(0); // start with the "dot" off
// initialize the LED pin as an output:
pinMode(ledPin, OUTPUT);
// initialize the pushbutton pin as an input:
pinMode(buttonPin, INPUT);
sevenSegWrite(NGait);
}
void writeDot(byte dot) {
digitalWrite(9, dot);
}
void sevenSegWrite(byte digit) {
byte pin = 2;
for (byte segCount = 0; segCount < 7; ++segCount) {
digitalWrite(pin, seven_seg_digits[digit][segCount]);
++pin;
}
}
void loop() {
// read the state of the pushbutton value:
buttonState = digitalRead(buttonPin);
if (buttonState == HIGH) {
digitalWrite(ledPin, HIGH);
if (NGait == 7) {
NGait = 1;
sevenSegWrite(NGait);
delay(2000);
}
else {
NGait = NGait + 1;
sevenSegWrite(NGait);
delay(2000);
}
}
else {
// do something here (or nothing!)
digitalWrite(ledPin, LOW);
}
}
