Arduino based humidity and Temperature real time reading displayed on a 16x2 LCD display
Sebastian Wolter
21-10-2015
Hello everyone, this time i will show you a very simple but fun real time temperature and humidity display, this one displays the information in a 16x2 lcd display, as show in the following imge:

As you can see it looks really cool. Now, to build this little gadget you will need:
- Arduino board (I used and UNO model).
- A power supply for the board (Can be AC-DC 9 v power supply, a pack of AA batteries, etc).
- One Humidity and Temperature sensor (I used the DHT11).
- DHT11 (in this case) Library, can get it from GitHUB: https://github.com/adafruit/DHT-sensor-library
- One 4.7 Kohm resistor.
- One 16x2 LCD Display (Or can be a bigger one also, or even a TFT based display).
- One half size + Breadboard (or bigger).
- Several cables to make the connections.
One you have all the parts, you need to do the wiring, which is shown in the following picture:

The wiring is as described below:
Potentiometer:
GND to GND
VCC to +5V
Signal goes to Display pin # 3
DHT11 sensor (Temperature and humidity):
GND to GND
VCC to +5V
Signal goes to Arduino digital pin # 7
LCD Display 16x2:
Pin # 1 goes to GND
Pin # 2 goes to + 5V
Pin # 3 goes to POT
Pin # 4 goes to Arduino Digital pin # 12
Pin # 5 goes to GND
Pin # 6 goes to Arduino Digital pin # 11
Pin # 11 goes to Arduino Digital pin # 5
Pin # 12 goes to Arduino Digital pin # 4
Pin # 13 goes to Arduino Digital pin # 3
Pin # 14 goes to Arduino Digital pin # 2
Pin # 15 goes to +5V through the 4.7 ohm resistor
Pin # 16 goes to GND
The Temperature and Humidity sensor i used is the model DHT11, which look like this:

In order to use this device inside your sketches on the arduino IDE, you have to download and copy its library to the libraries folder in your local arduino IDE installation.
Once you have downloaded the library, you need to put it inside the arduino IDE libraries folder, just like this:
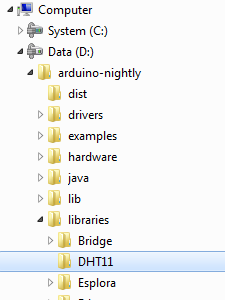
And put the both .CPP and .H files inside the folder named DHT11, like this:

If you verify the sketch inside the arduino IDe and get error aboout the library, go to:
Sketch -> Include Library -> And select the DHT library (You should see it there, if not, restart the IDE):

Once everything is correctly wired, and the library has been added to the arduino IDE and your Compile/Verify is OK, you have to upload the arduino sketch to your board, the original code is to display the "Hello World" phrase on a LCD display, i just have modified it a bit to add the temp and humidity sensor reading and display it on the LCD screen instead of the "Hello World" phrase.
The sketch code is as follows:
/*
LiquidCrystal Library
Demonstrates the use a 16x2 LCD display. The LiquidCrystal
library works with all LCD displays that are compatible with the
Hitachi HD44780 driver. There are many of them out there, and you
can usually tell them by the 16-pin interface.
The circuit:
* LCD RS pin to digital pin 12
* LCD Enable pin to digital pin 11
* LCD D4 pin to digital pin 5
* LCD D5 pin to digital pin 4
* LCD D6 pin to digital pin 3
* LCD D7 pin to digital pin 2
* LCD R/W pin to ground
* LCD VSS pin to ground
* LCD VCC pin to 5V
* 10K resistor:
* ends to +5V and ground
* wiper to LCD VO pin (pin 3)
Library originally added 18 Apr 2008
by David A. Mellis
library modified 5 Jul 2009
by Limor Fried (http://www.ladyada.net)
example added 9 Jul 2009
by Tom Igoe
modified 22 Nov 2010
by Tom Igoe
This example code is in the public domain.
http://www.arduino.cc/en/Tutorial/LiquidCrystal
*/
// include the library code:
#include <LiquidCrystal.h>
#include <DHT.h>
#define DHTPIN 7
#define DHTTYPE DHT11
DHT dht(DHTPIN, DHTTYPE);
// initialize the library with the numbers of the interface pins
LiquidCrystal lcd(12, 11, 5, 4, 3, 2);
void setup() {
dht.begin();
// set up the LCD's number of columns and rows:
lcd.begin(16, 2);
// Print a message to the LCD.
//lcd.print("hello, world!");
Serial.begin(9600);
}
void loop() {
float h = dht.readHumidity();// Lee la humedad
float t = dht.readTemperature(); //Lee la temperatura
Serial.println("Humedad: ");
Serial.println(h);
Serial.println("Tempera: ");
Serial.println(t);
// set the cursor to column 0, line 1
// (note: line 1 is the second row, since counting begins with 0):
lcd.setCursor(0,0);
lcd.print("Temperatur");
lcd.setCursor(11, 0);
lcd.print(t);
lcd.setCursor(0,1);
lcd.print("Humedad");
lcd.setCursor(11, 1);
lcd.print(h);
// print the number of seconds since reset:
//lcd.print(millis() / 1000);
}
The sketch ".ino" source code an be downloaded from here: Arduino Sketch File
DHT11 library can be downloaded from here: DHT11 arduino library code files
Enjoy!
No hay comentarios.:
Publicar un comentario